Appearance
The Studio interface
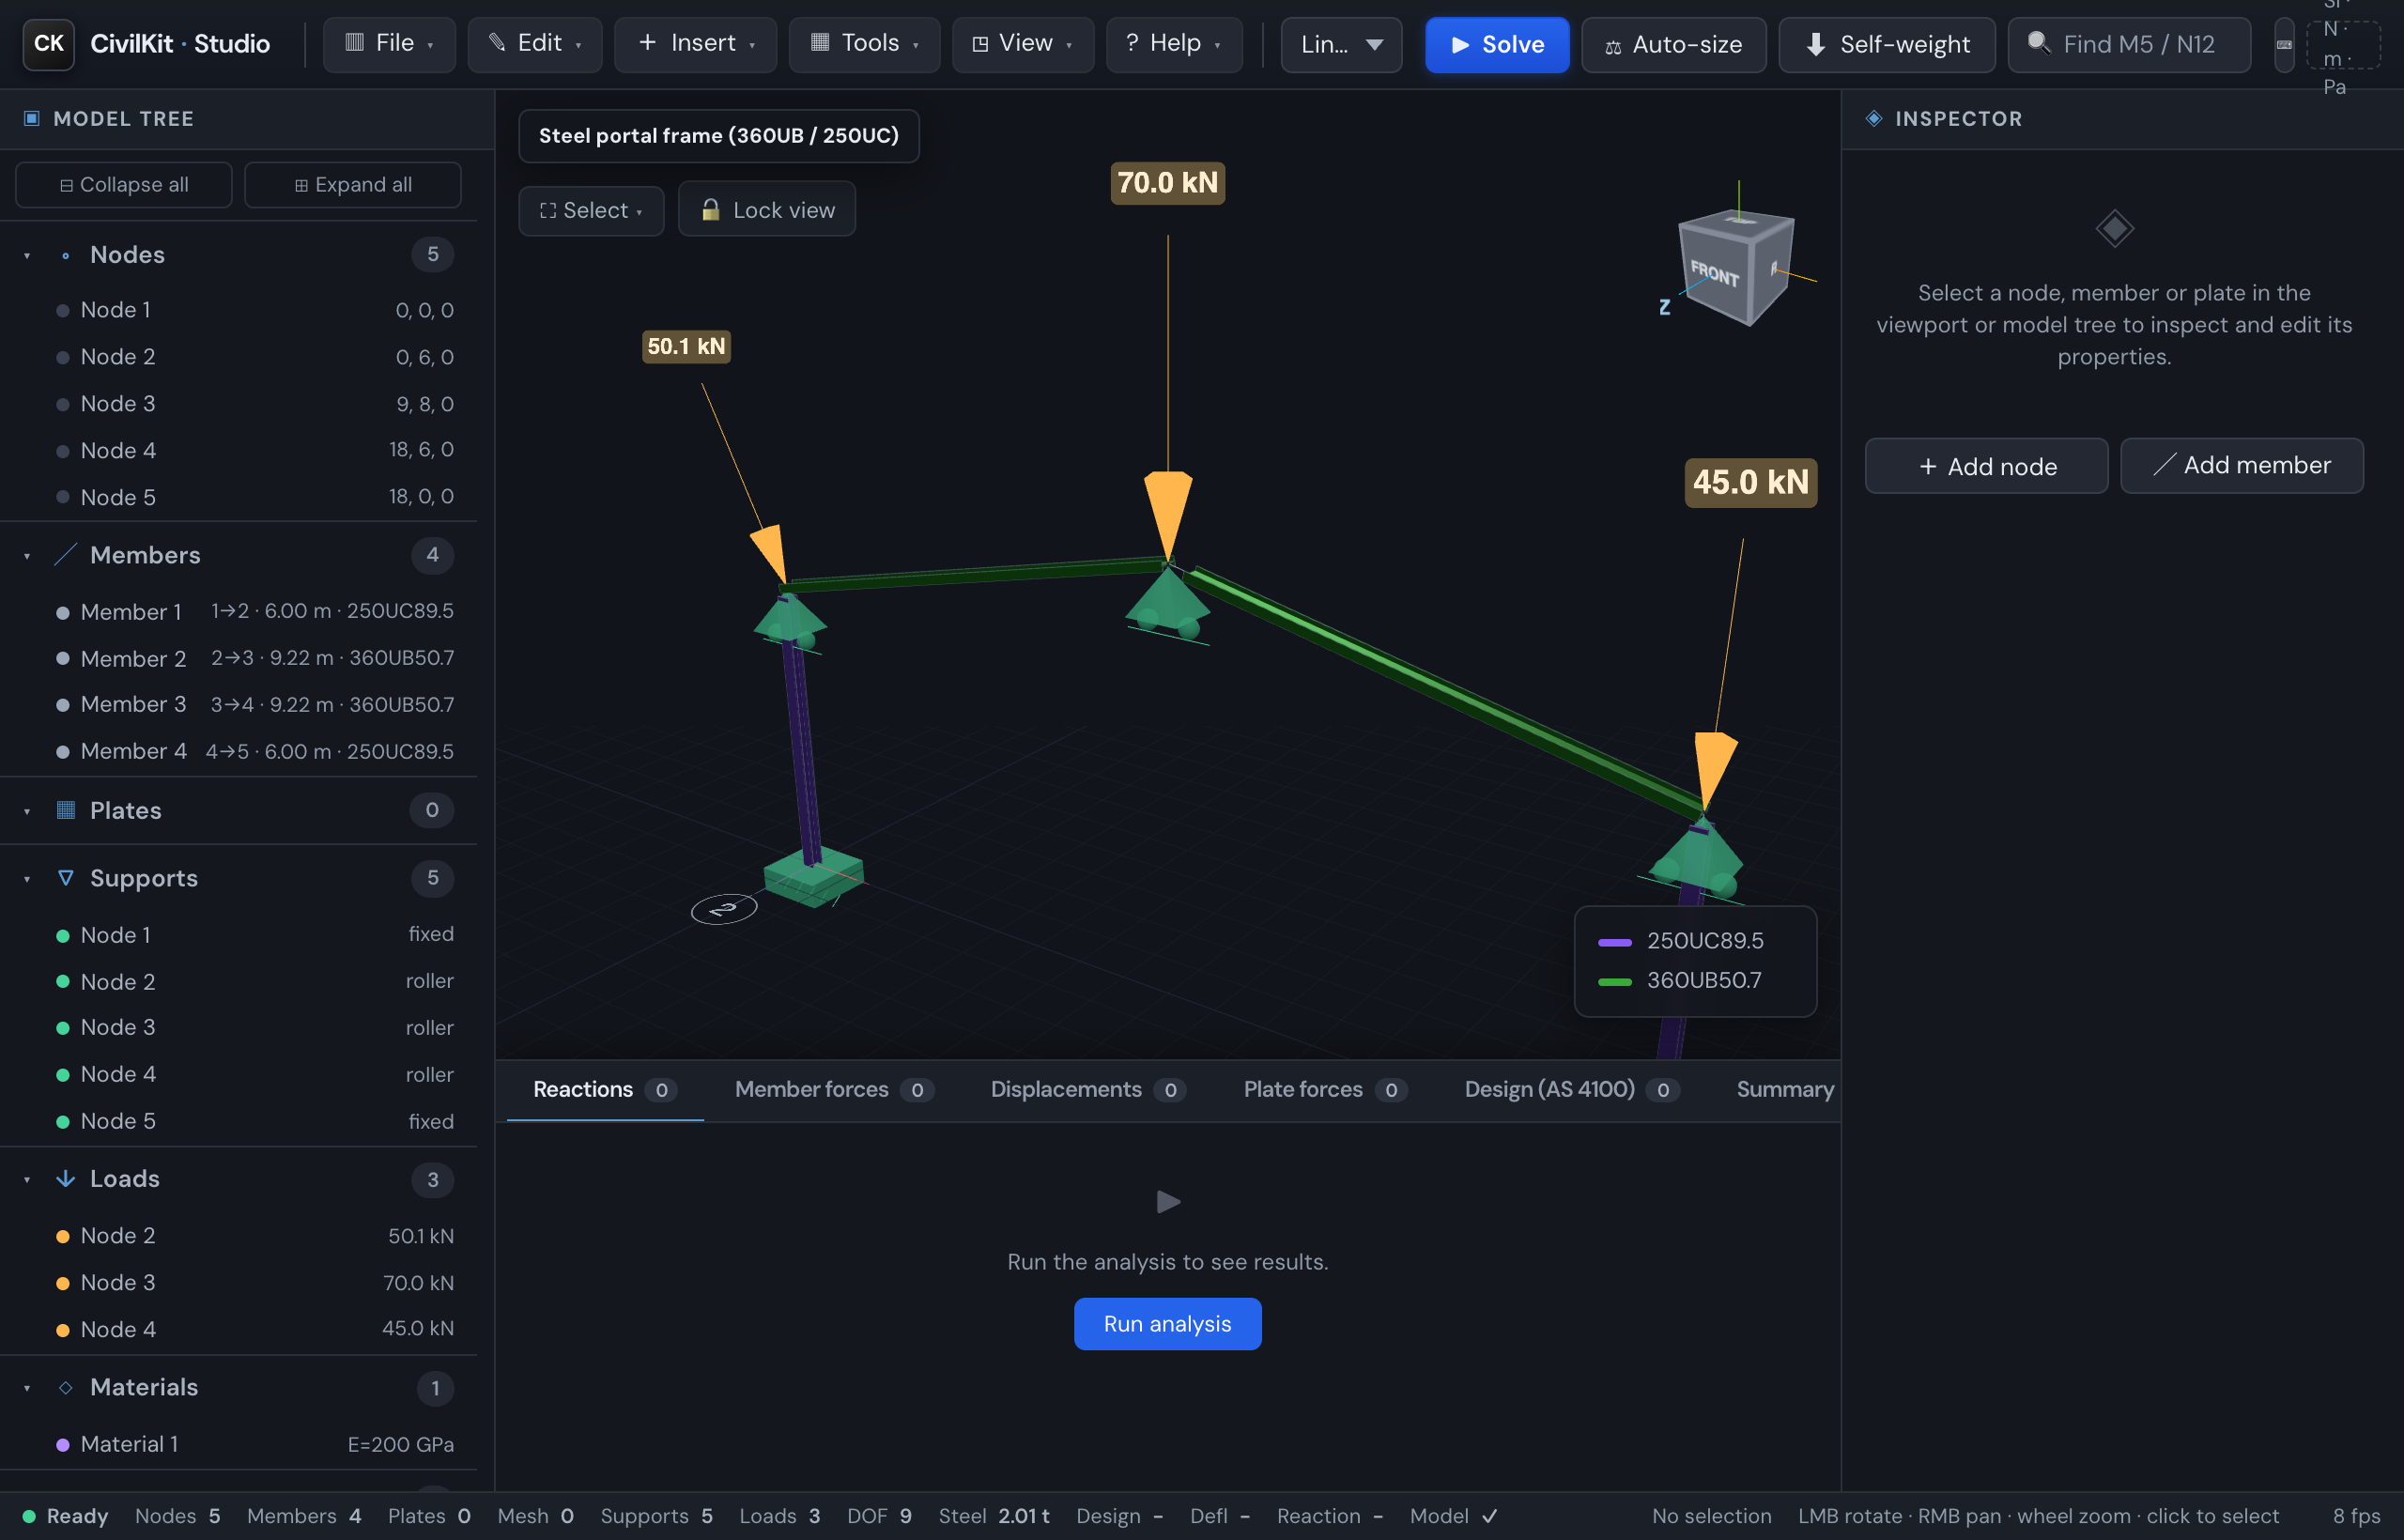
This is a guided tour of the CivilKit Studio screen, naming every control so the rest of the manual can point you straight at it.
The window has a fixed layout: a slim suite bar at the very top, a menu bar and toolbar below it, the Model Tree down the left, the 3D viewport in the middle with the Results panel docked below it, the Inspector down the right, and a status bar along the bottom. Two more things appear on a keypress: the command palette and the keyboard shortcuts overlay. If this is your first visit, start with Getting started.
Suite bar (modules)
The thin strip across the very top carries the CivilKit name and a chip for each module in the suite. CivilKit is one app that hosts several tools; you switch between them here without leaving the page, and they share the same model and section library.
- Analysis - modelling, analysis, design and the report. Free and always available.
- Sections - a builder for your own custom section families: pick a shape (rectangle, circle, CHS, RHS, I-section, channel, T, angle, cruciform, or a monosymmetric I), edit its dimensions with a live SVG and the full computed property set, then save it into a named family. A Materials tab manages standard and custom materials, and you can export or import your whole library as JSON. Anything you build here shows up in Analysis's section picker under Custom (your sections), ready to assign to members - one library shared across the suite. See Sections & materials.
Owned modules switch instantly; a locked one opens a short description rather than a dead click. As more modules arrive (Footings, Retaining, Columns), they appear here too - buy one or the whole suite, and everything you own works as a single tool.
Menu bar
The row of named menus at the very top. Each one drops down a list of actions, many with their single-key shortcut shown on the right. There are six menus.
- File - New model, Import (JSON / DXF / DWG / SpaceGass / IFC / SAF), sample models, Export, Save image, Copy share link, Cloud versions, Report (PDF) and the connection schedule, and Settings.
- Edit - Undo, Redo, Duplicate, Copy, Paste, Delete, Select all, Select all of type, Clean up model and Snap to grid.
- Insert - Add node, Add member, Generate structure, Load cases and Load combinations.
- Tools - the standalone calculators (Section, Retaining wall, RC slab, RC beam, Bolt and weld, Special steel checks), the footing and site tools, Wind loads and the Load generator (1170), and the analysis dialogs (influence lines, Response spectrum, Time history, Storey drift).
- View - camera angles (Iso, Top, Front, Side, Fit), the Lines / Solid render mode, show or hide of the three panels, Data sheets, and the show/hide toggles for labels, dimensions, grid, nodes, hinges, members, plates, supports, loads and connections.
- Help - User manual, About and validation, the Verify suite and Keyboard shortcuts.
Toolbar
The strip directly under the menu bar holds the controls you reach for on every model, working left to right after the CivilKit Studio logo.
- Analysis type - the dropdown that picks the calculation: Linear static, T/C only, P-Delta, Buckling or Modal. See Analysis and results.
- Solve - the blue button that runs the analysis (shortcut
S). - Auto-size - finds the lightest steel section that passes the design checks for each member.
- Self-weight - adds the members' own weight as gravity loads; click again to remove it.
- Find - the search box (placeholder "Find M5 / N12"); type an element id and press Enter to select and zoom to it.
- Units chip - the small label at the far right (for example "SI . N . m . Pa") showing the active unit system. Change it in Settings.
Model Tree
The panel down the left, titled Model Tree. It is the structured list of everything in the model, grouped by kind, and is the quickest way to find and select an item by name rather than by clicking in the 3D view.
- Groups for nodes, members, plates, supports and loads.
- Click an entry to select it (it highlights in the viewport and opens in the Inspector).
- Toggle the whole panel with the
[key or from the View menu.
Inspector
The panel down the right, titled Inspector. It shows the properties of whatever is currently selected and is where you edit one item at a time.
- Editable fields for the selected node, member, plate, support or load.
- For a member, the Browse sections button opens the steel section library.
- After a solve, the selected member's result and design check appear here too.
- Toggle the panel with the
]key or from the View menu.
Results panel
The panel docked below the viewport, shown as a row of tabs. It holds the numbers that come out of a solve. Each tab carries a small count badge, and a toolbar on the right filters, copies or exports the visible table.
- Tabs: Reactions, Member forces, Displacements, Plate forces, Design (AS 4100), Connections, Summary and Console.
- Filter rows box - narrows the table to a node or member (for example N5 or M12).
- Copy - copies the visible table for pasting into a spreadsheet; CSV downloads it as a file.
- The collapse button (the small chevron) hides or reopens the panel; the
\key does the same.
Status bar
The thin strip along the very bottom. It is a read-only dashboard: the model's running tallies on the left and your current context on the right.
- A state light and label, then counts of Nodes, Members, Plates, Supports, Loads and DOF (degrees of freedom).
- Steel total mass, and after a solve the worst Design utilisation, peak Defl (deflection) and largest Reaction; click any of these to jump to the governing element.
- Model - the validation tick; click it for details.
- On the right, the current selection and a short mouse-control reminder (rotate, pan, zoom, click to select).
Command palette
Press Ctrl/Cmd+K to open the command palette: a single search box that finds and runs any Studio action by name, so you never have to remember which menu it lives in.
- Type part of a command's name to filter the list, then press Enter to run the highlighted one.
- Type a number (or "n12" / "m5") to jump straight to that node or member.
- Matching shortcuts are shown beside each entry; press Esc to close.
Keyboard shortcuts
Press ? at any time (or Help, then Keyboard shortcuts) to open the shortcuts overlay: a printed cheat sheet of every single-key and chord shortcut, grouped by category.
- Read-only reference, grouped into Navigation, File, View and the rest.
- Lists the command palette (Ctrl/Cmd+K) at the top.
- Press Esc or
?again to close it.