Appearance
Connection design (AS 4100)
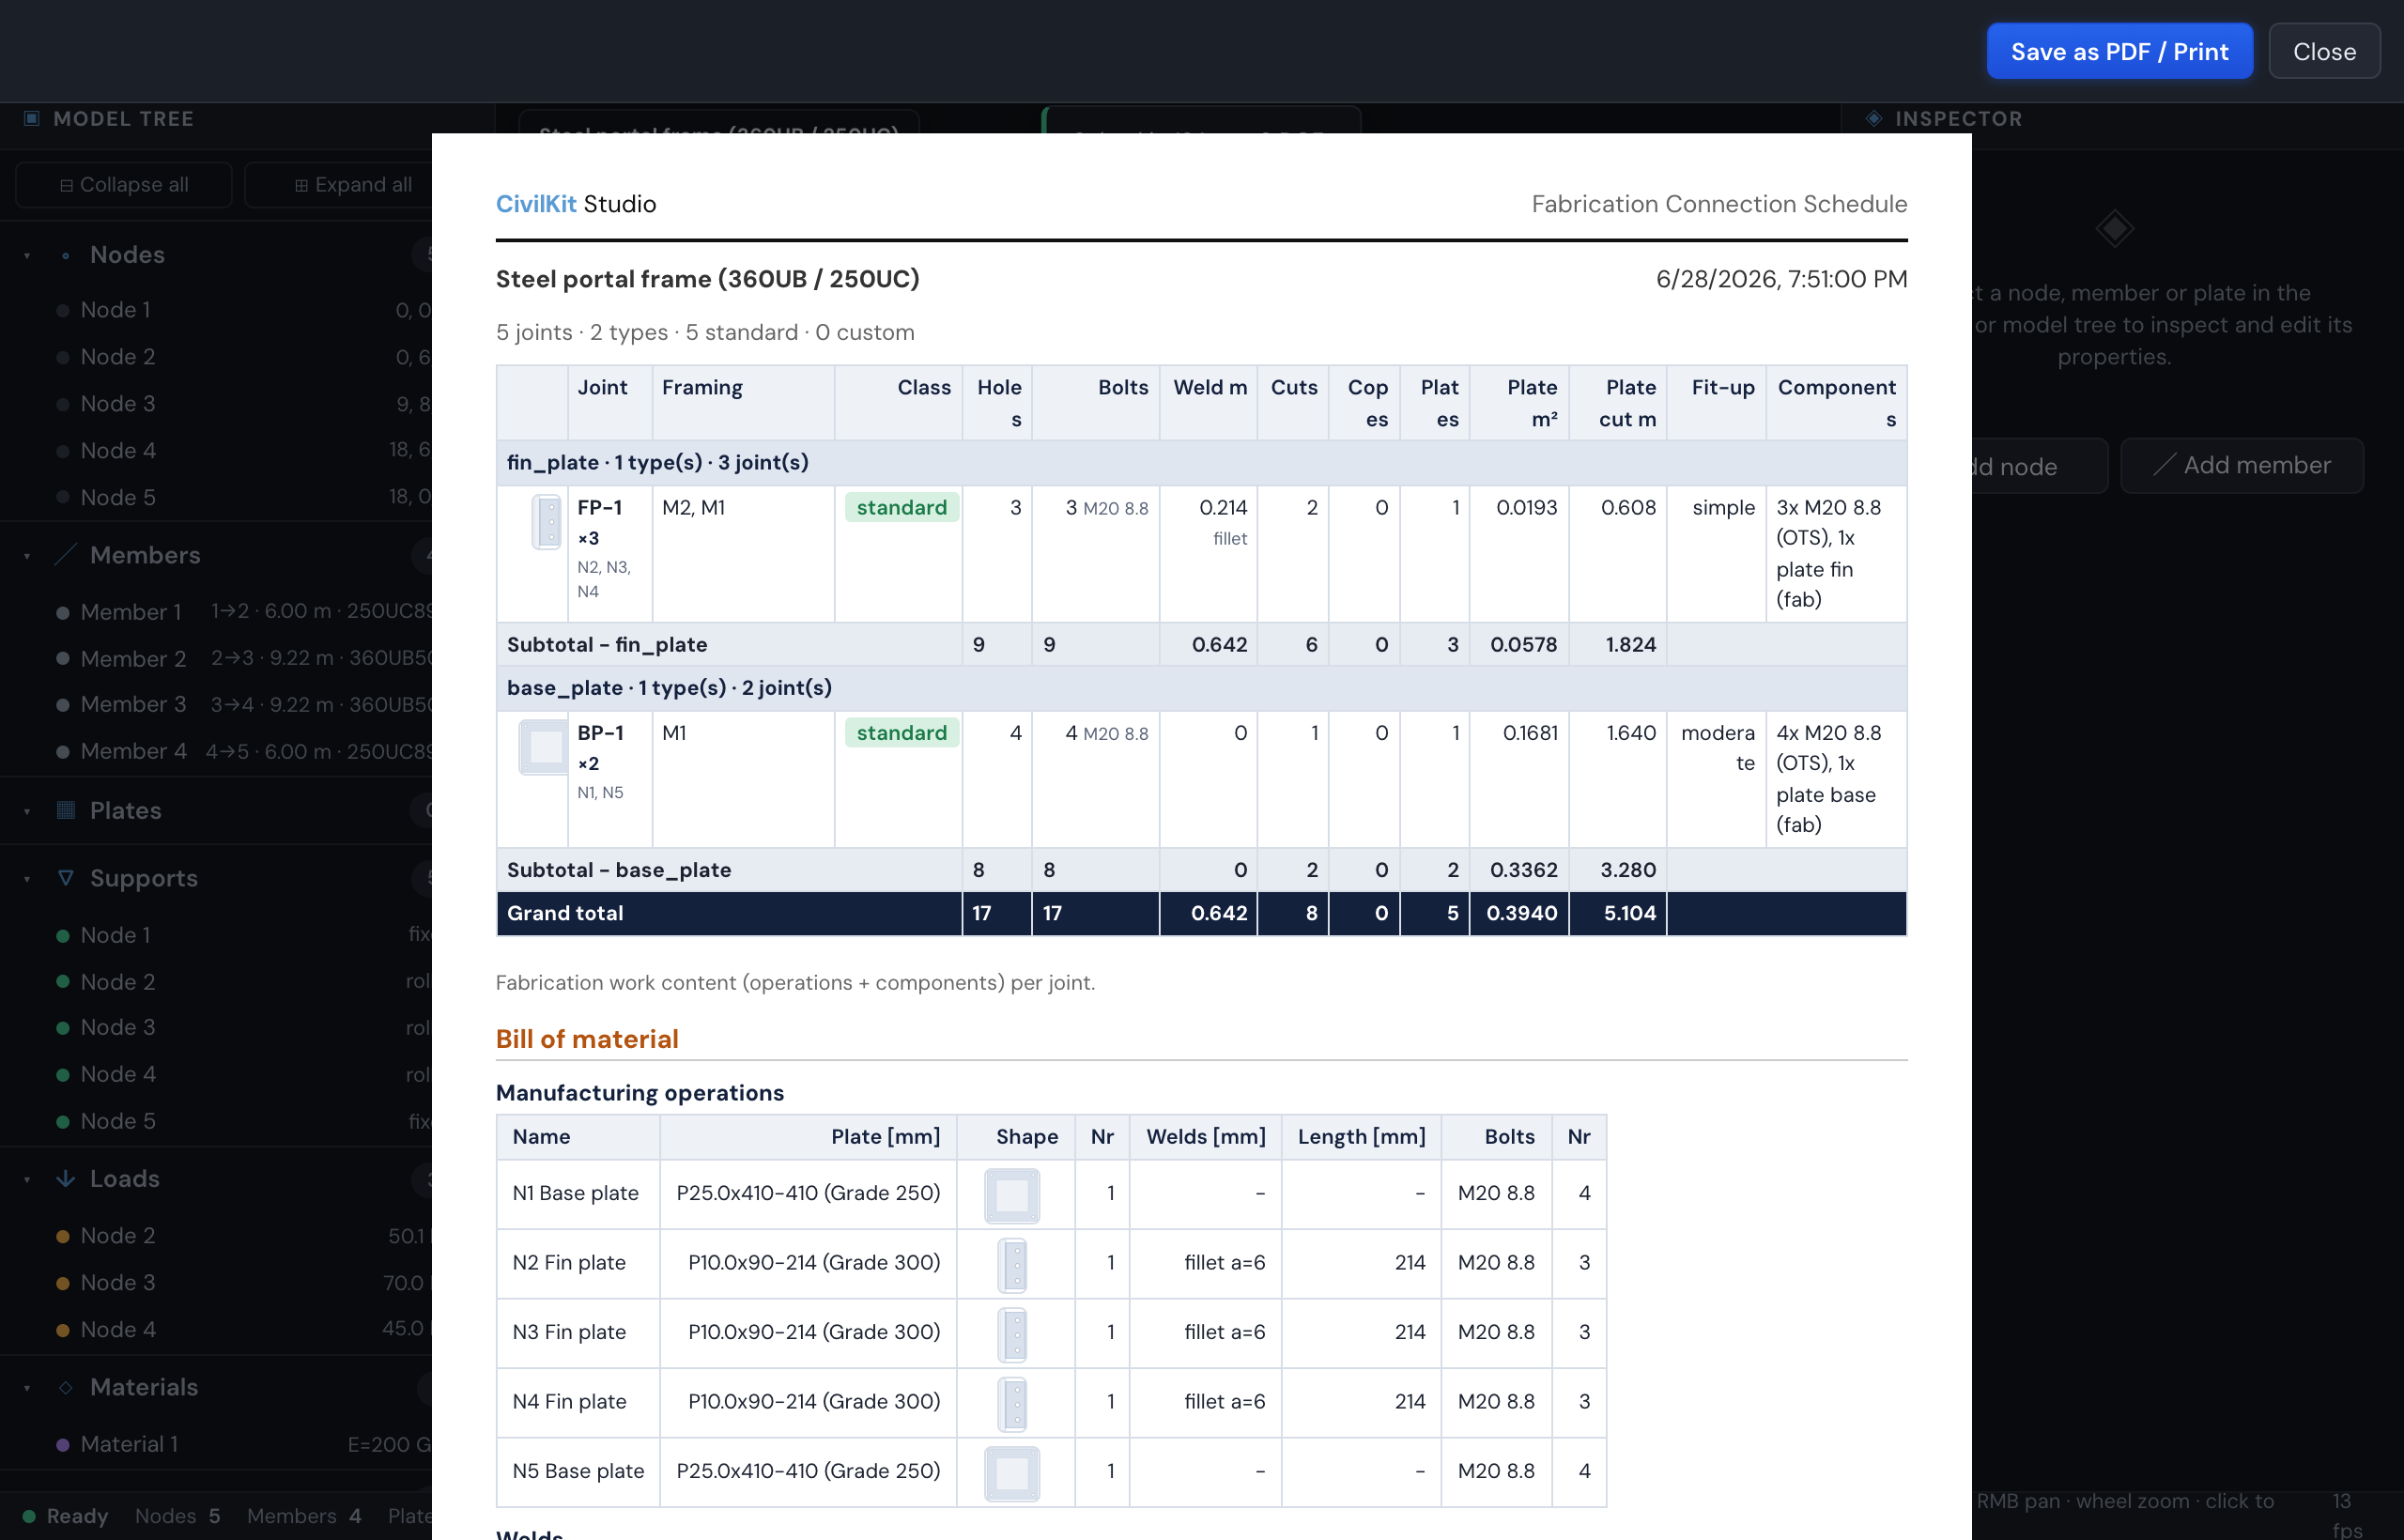
Connection design is one of the main reasons engineers reach for separate software. CivilKit Studio designs steel connections in place - the demand is pulled straight from the analysis, so you go from forces to a checked connection without leaving the model or re-keying numbers.
| Connection | Where | Demand pulled from | Standard |
|---|---|---|---|
| Base plate | a support node | the support reaction (N*) | AS 4100 Cl 9 / bearing |
| Fin plate (shear) | a member end | the member's peak end shear (V*) | AS 4100 |
| End plate (moment) | a member end | the member's peak end moment (M*) | AS 4100 |
There are three ways to work: auto-design the whole model from the connection schedule (fastest), design one connection at a time in the inspector, or open the Connection Designer workspace for full control over one joint - template, geometry, checks, detailing audit and (analysis-only) joint FEA. All three use the same engine and the same checks.
Actively maturing - not yet hardened
Connection design is the newest part of CivilKit and is still maturing. All twenty-one library templates run a real first-principles check and the demands come from the verified analysis, but the checks are not yet independently benchmarked against published worked examples the way member design is. Treat the output as a first-pass aid: confirm every connection (bolts, welds, plate, block shear, detailing) against AS 4100 and your own judgement before it leaves your desk. The engine is steel / AS 4100 only - timber and multi-code connections are not designed. The joint FEA is analysis-only - the closed-form component checks remain the source of truth.
Once designed, connections feed the fabrication schedules - the per-joint schedule, the fabricator worksheet and the take-off for estimators.
Auto-design the whole model (Connection schedule)
Most engineers don't hand-design every joint - they size the governing ones and specify the rest by category. The connection schedule mirrors that: it walks every joint at once and proposes a sized connection from the analysis.
- Solve the model.
- Open the Design → Connections tab and click Auto-design all.
- The engine, for every node, classifies the joint from the members framing in and their end forces - beam-into-column shear (fin plate), beam-into-column moment (end plate), or column base plate - then auto-sizes it (stepping bolt count → diameter → plate thickness) until it passes, pulling the design action straight from the solved end forces.
The schedule lists every connection with its joint, class, template, governing utilisation, OK / OVER status, and source:
| Source | Meaning |
|---|---|
| auto | the engine assumed and sized this connection for you |
| manual | you edited it (see below) |
| design | imported as an engineer-specified connection |
A joint the engine cannot detail within its template's declared envelope is listed as Refused, never as a guess - see Validity envelope & refusals.
The summary line reads, e.g. "47 connections: 12 specified, 35 assumed", so an estimate is honest about what is real versus assumed. Use Show OVER only to jump straight to the joints that fail.
Click a row to open that joint in the inspector with its utilisation bars. Edit the bolt count, bolt diameter or plate thickness and it re-checks live - the connection flips to manual and the schedule updates. Export PDF sends the whole schedule into the report.
The schedule is saved on the model (model.connections[]), so it rides along with export / import and share links - and the same data feeds CivilKit Fab so a fabricator can cost the connections without re-keying anything.
One engine, three front doors
Auto-design, the per-element inspector panels and the Connection Designer workspace all run the same @civilkit/connections engine and the same AS 4100 checks - the schedule just applies it to every joint at once. The checks are closed-form (the component method); a 3D CBFEM shell-FEA backend exists behind the same interface as an analysis-only instrument.
Connection library
The connection library is a catalogue of twenty-one standard templates covering six families - shear, moment, base, splice, brace and apex. Every entry runs a real first-principles AS 4100 check (there are no "detail-only" entries that skip the check):
| Template | Family | Check that runs |
|---|---|---|
| Fin plate | shear | bolt group, ply bearing/tear-out, block shear, plate shear, weld |
| Double-angle web cleat | shear | two-cleat model, beam-web bolts in double shear |
| Flexible end plate (header plate) | shear | as fin plate |
| Beam-to-beam fin plate | shear | fin plate into a primary beam's web |
| Ridge tie cleat | shear | as fin plate, placed under the rafter's soffit |
| Seated beam, stiffened seat | shear | seat plate bending, supported web bearing yield and buckling, stiffener, stem weld |
| Purlin cleat | shear | bolt group, purlin web bearing (AS/NZS 4600), cleat bearing, cleat bending, foot welds |
| Girt cleat | shear | as purlin cleat, on the column's face |
| Purlin bridging bracket | shear | bolt group, plies in bearing, bracket leg bending (AS 4100 Cl 9) |
| Flush end plate | moment | tension bolts + plate bending |
| Extended end plate | moment | tension bolts + plate bending |
| Welded moment | moment | CPBW develops the parent flange |
| Pinned base plate | base | concrete bearing, plate bending, anchor uplift |
| Fixed (moment) base plate | base | AS 3600 bearing + AISC DG1 plastic block |
| Base plate + shear key | base | key bearing & bending |
| Bolted splice | splice | flange/web covers, bolt group, block shear |
| Cold-formed lap | splice | bolt group with the lap reduction factor, both webs in bearing (AS/NZS 4600) |
| Bolted apex | apex | bolted moment end plate at a ridge |
| Haunched apex | apex | bolted moment end plate, haunched |
| Rod bracing cleat | brace | rod tension on the thread area, pin shear and bearing, lug bearing and tear-out |
| Gusset / brace | brace | Whitmore section (yield or buckling by brace sign) + block shear |
Applying a template from the library - you can use either entry point:
- Inspector - click "Browse library" from a selected connection to apply a template to that one joint. The check re-runs immediately.
- Schedule - use "Apply to all of class" to apply a template to every joint of the same class (e.g. all
beam_col_shearjoints at once). - Connection Designer - the new-connection wizard walks Class → Topology → Design → Parameters; its taxonomy is the library, so a template added to the library appears in the wizard automatically.
The applied template (template, view, libraryRef, checkStatus) is stored on the connection and survives export / import and share links.
Validity envelope & refusals
Every template declares the domain it is valid in, derived from the AS 4100 detailing rules - never fitted to what the drawing code happens to produce:
- Bolt diameter range (default M12-M36, the AS 1252 catalogue scope);
- Ply thickness floor, derived per template from Cl 9.5.3 / 9.5.4 inverted through the bolt-spacing rules at its own default pitch and edge distances;
- Flange width for two bolt columns - a two-column detail needs
minPitch + 2 × minEdge(= 5.5d; 132 mm at M24) on the ply that carries the bolts, and the template declares which ply that is; - A named alternative - the template to detail instead when this one doesn't fit (e.g. end plates point at fin plate or web cleat).
Ask for a connection outside that envelope and the joint is refused:
- No geometry is emitted at all - no plate, bolt or stub is drawn, and the Model tab shows the reason instead of a picture.
- It does not solve - neither the component check nor the joint FEA will run on a refused joint.
- It keeps no verdict - the Checks panel and the report withhold the utilisation table (a refused joint can never print a green row of zeros or a meaningless OVER), the schedule row reads Refused, and the printed joint page leads with "AS REQUESTED, NOT BUILT".
- Every refusal ends in a remedy: a number that works when followed to the letter (widths to build to are rounded up, ceilings to detail within are rounded down), or - where the binding ply is a section flange nobody can widen - a one-click switch to the named alternative template. The switch discloses that it discards hand-edited geometry.
Some joints are declared rather than detailed before any template is chosen, because what they need is not in the library. Each states its reason and a remedy on the schedule row and in the 3D pane, and draws nothing:
- Support not modelled - a beam end on a restrained node with no supporting member in the model (a wall, a pad, a bracket nobody drew).
- Non-steel member - an RC or timber member; this is a steel library.
- Rod anchorage not modelled - a rod or cable ending alone at a support (a guy anchor, a deadman, a lug cast into a footing).
- Hollow-section splice - a CHS/RHS/SHS splice; the bolted splice recipe is flange and web cover plates for I-sections, and a tube is spliced with end plates or a welded sleeve.
Minimum design actions (AS 4100 Cl 9.1.4)
Connection demands are floored at the clause minimums before any check runs: 0.5 φMs for moment, min(0.15 φVv, 40 kN) for shear and 0.3 φN for axial. A lightly loaded member still gets a connection designed to the clause floor, and the checks panel flags which actions were governed by the minimum rather than the analysis.
Detailing audit
Separate from the capacity checks, a buildability audit runs over the placed joint geometry and answers "could a fabricator actually build this?". It exists because capacity checks converging perfectly says nothing about whether the detail clashes. Findings include:
- bolt group asymmetric about its own gauge line;
- a bolt that grips only one ply (or whose shank doesn't reach through every ply it grips);
- a plate that overhangs its member past the last bolt, or an orphan plate touching nothing;
- coincident plies occupying the same space;
- bolt spacing / edge distance below the AS 4100:2020 minima (Cl 9.5.1 / Table 9.5.2);
- a bolt running along a web in its plane.
Audit findings surface in the designer's Checks panel and print on the joint page of the report at error severity. The audit also gates the library itself: every template is audited at its default geometry, and a sweep over every template (each at 3 section tiers × 6 bolt diameters) is ratcheted in CI so the known-failure count can only go down.
How it works (single connection, in the inspector)
- Solve the model so the reactions and member end forces exist.
- Select the support node (base plate) or member (fin / end plate).
- Expand the connection panel in the inspector and set the connection details (plate size, bolts, weld). The design action is pre-filled from the analysis.
- Read the live utilisation bars, the governing utilisation with OK / OVER, and the required vs provided values.
Connection inputs live on the element (n._baseplate, m._finplate, m._endplate) and ride along with export / import and share links, but they are stripped before the model reaches the solver - they never affect the analysis.
Tidy inspector
The member's optional checks (fin plate, end plate, plus the concrete / composite panels) sit under a single collapsed "Connection & material checks (optional)" expander, so a plain steel member stays clean. Expand the group, then the specific check you need.
Base plate
Select a support node. The panel:
- pulls N* straight from the support reaction;
- pre-fills the column
d/bffrom the connected column's catalogue section; - lets you set plate B / D / t, f'c (concrete bearing strength) and the bolt count;
- shows utilisation bars for bearing (Cl 9, confined), plate bending, and bolt uplift, plus the required vs provided plate thickness.
Fin plate (shear connection)
Select a member. The panel pulls V* from the member's peak end shear and takes bolt count / diameter, plate depth / thickness and weld leg. Utilisation bars cover the bolt group, plate shear, bearing, tear-out and the weld, with the governing utilisation and φVdes.
End plate (moment connection)
Select a member. The panel pulls M* from the member's peak end moment and shows tension-bolt and end-plate-bending utilisation bars, the governing OK / OVER, and φMdes. End plates place their bolts in two columns straddling the web; a flange too narrow for two columns at code spacing is refused with the required width named, not bolted through the web.
3D joint view - the Model tab draws what is checked
Selecting a connection renders the joint as a 3D solid in the viewport. The solid is built from the same placed-layout primitives the checks, drawings, DXF export and FEA mesher all read - one geometry stream feeds every view, so the picture can never quietly disagree with the calc. Fin-plate or end-plate with hex bolts through it, fillet weld beads at the plate-to-column face, and short member stubs are drawn to scale, oriented to the actual members.
A refused joint draws nothing - the empty stage is captioned with the reason, so a blank joint is always explained, never silent.
The Connections layer (View menu toggle) shows every joint in the model simultaneously rather than just the selected one - useful for a quick scan of geometry consistency across the whole frame. Turning the layer off reverts to single-selected display.
Wheel-zoom in the viewport zooms toward the cursor position, so you can scroll in on a tight joint without re-centring the view first.
The Connection Designer workspace
For full control over one joint - choosing the template, editing every parameter, reading the audit, and running the analysis-only joint FEA - open the Connection Designer workspace. It has its own Model / Mesh / Stress tabs, a load-case table, and a scriptable action surface.
Into the report
Every connection you design lands in the PDF report: a Connection design section tabulates each base / fin / end plate with its bolts, plate size, design action, the component utilisations and the governing verdict. The report re-runs the same check at print time, so the inspector and the submittable calc always agree. Refused joints print as Refused with their remedy - never with a utilisation table - and the detailing audit findings print alongside the checks on the joint page.
Verify before professional use
These are early, transparent connection checks. Confirm bolt grade, weld category, edge distances, plate steel grade and the governing load combination against AS 4100 and your fabricator's standard details before relying on them.